The whole photography is about Four things or based on Four elements, two of them we have already discussed and will begin with some in detail. These Four Elements are:
1. Composition
2. Exposure
3. Light
4. Lens
We have already seen that what is Composition and Exposure, anyhow I would like to talk in brief about these two things. First is composition and it means that you have to be as precise as possible, it means that you have to give focus to the main subject, which also means that you have to avoid unnecessary cluttering, that may be people or surrounding environments. Take close ups when required or later crop the picture to make it a good looking image. The subject should be placed away from the center because the center is static and creates no interest doesn't show any movement on the subject, it makes the subject appear still which destroy all your labor and effort done in taking that shot. You don't get another chance to shoot in the same mood and scene. Therefore, it is also recommended to shoot two - three shots of the same scene. The composition can also mean a strait line that can be of railway track, round stairs, that can be a structure of a building or it can also be story telling if captured properly.
Similarly, when we talk about Exposure- it is about Aperture, Shutter Speed & ISO. Aperture gives bokeh or blur effect or we can say controls depth of field, Shutter Speed controls the motion of an object and ISO it is the sensitivity of camera sensor to light.
Now, here comes the Light - This determines the complete image of a subject. We consider a scenario where we are in open space near a river. It is evening time, when the sun is about to set, at this time the lighting condition is poor and during this time it becomes difficult to maintain the exposure, but under such condition you should not use flash to take the clear shot because the flash blast could destroy your whole image, it is better to take the shot with a shutter speed that shot could be taken handheld or slower shutter speed but then use a tripod to put the camera, increased ISO and wider aperture because under such condition more light is required.
I will share an image to describe such condition. Actually, I was on a tour with my cousins near Ganga Ji Haridwar (Uttarakhand) and it was the time when the sun was about to set and the lighting condition was bit ok, not too much poor and the scene was so beautiful that I could not resist myself from taking this picture. This is handheld shot, after taking the shot, I went home and edited this image in lightroom and photoshop and then I got my final processed image.
 | |||||||||||||||||||||||||||||||||||||||||
| Aperture - f/4.0, Shutter Speed - 1/160 & ISO - 125 |
Especially night time photos should be taken without flash, I am talking about those scenes which create some sort of mood or environment. If you are in a wedding that is of the night then at that time a good light is required. So, everything depends on the scene and mood, a few clicks of objects that I photographed at night in low light condition, are with me that I would like to share with you.
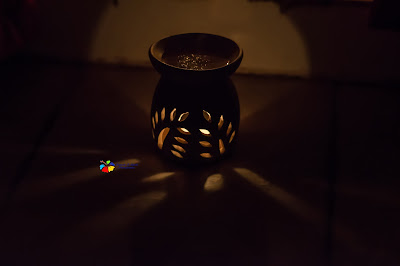 | |
| Aperture - f/2.8, Shutter Speed - 1/50 Sec, ISO - 2000 |
After seeing them I tried to create a scene, low light condition attractive to eyes, the mood was at it's high and the scene was such that could not be ignored and I liked most about the temp of this.
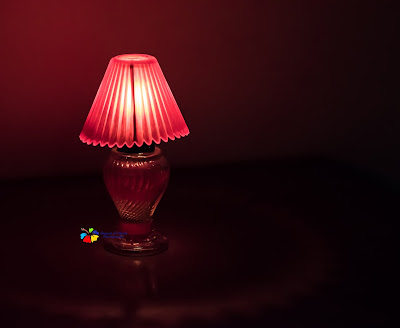 |
| Aperture - f/2.8, Shutter Speed - 1/60 Sec, ISO - 3200 |
In the above pictures, if I would have used the flash definitely that would have spoiled the scene & mood. Thus to maintain such environment you should keep the flash off and try to shoot the subject.
SUNLIGHT:
I already talked about light and it's role in photography, today we will try to understand that how sunlight impacts on our subject. During the sunny day if you will try to keep the person facing towards the sun then the light will properly fall on the face but it will make the person shut his eyes. As you can see below in the image that I tried to photograph a child and he could not open his eyes due to direct sunlight falling on his eyes. This situation could destroy all your efforts.
 |
| Sunlight falling directly on child's face |
Same shot you can take beautifully if you move him or yourself a little bit covering the sun. I did the same thing, I covered him from the direction where sunlight was directly falling on his face. You can see below in the image that how I tried to take his photo. I am not saying that this is the best shot but the way of correcting the way of taking the pic, I admit that this could have been taken more brilliantly than this. This Photo I am displaying just for an example.
 |
| This image was taken covering the direct Sun Light |
If I say that we have to utilize the light in a way that it could give some impact on our photo. Photography is not just about taking a shot, but to shoot a person with your camera in a way that it brings out the personality. This is not about a beautiful or handsome person but about to make your photo beautiful by using Light as a source of highlight and exposure for your photo. Below in the image, you can see that the person is indoor but what I did, I just placed him to the side of a window from where the light is highlighting the person and it makes the photo all the more beautiful.
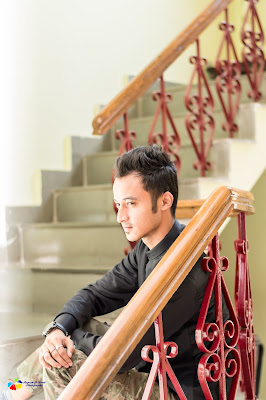 |
| Sun Light from window creating glaring effect on face |
Now, I will show you the same place but restrict the window light, instead using flash to remove any shadow. You will find that how natural light affects the whole image, as I already told you that I don't possess any special gear for photography, I just try to use the natural light or at night try to use the home made do it yourself lighting system. As I am not a professional photographer, I don't need these highly expensive equipment, what I need for is macro and home photo shoot especially evening time. Below is the same image with flash, restricting direct light from the window, using a curtain.
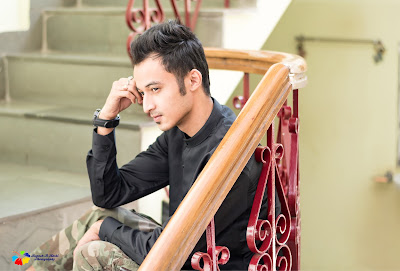 |
| Flash used to remove the shadow |
If you are shooting outdoor then always try to use side light, rather than direct flat straight light on the face because it creates a flattened image. Therefore, on the basis of my experience, I always go for side light falling on face. This gives some impact on the person you are photographing, fill flash is also one of the options but we will discuss that later in the upcoming posts. Below is the image with sunlight falling on one side of his face.
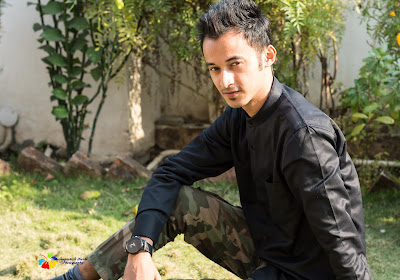 |
| Photography using side lighting technique |
If you think that what I am trying to explain is right and you have also experienced the same then share your experience and difficulties in the comments below. We can also play with light in the case of a portrait photograph.
In this post today, I discussed the light from front & side and their impact on our image. In my upcoming blog post, I will try to discuss some more things that I could collect and present in front in this blog with some more such examples. Your comments are always welcome and appreciated.
In this post today, I discussed the light from front & side and their impact on our image. In my upcoming blog post, I will try to discuss some more things that I could collect and present in front in this blog with some more such examples. Your comments are always welcome and appreciated.


0 comments:
Post a Comment