One of my
friend asked me, "what is aperture, shutter speed and ISO, I don't
understand what is the link between these three to take good picture?"
So today, I am going to talk about these three.
Before going
any further, first we need to understand the concept. Let us consider one by
one:
1. Aperture:
If you see through a lens, you will see some blades are there and they make the
small or lager hole. If the hole is small, the less light enters and just opposite
to this, if the hole is large, the more light enters. Aperture also controls
the depth of field. The wider the aperture, the shallow depth of field. The
smaller is the aperture, the long depth of field we get. Aperture is measured
in "f" numbers like f/1.8, f/2, f/2.8, f/4, f/5.6 ..... f/18, f/22.
Wider
Aperture = More Light eg. f/1.8 = Shallow
Depth of Field
2. Shutter
Speed:
When we talk about shutter speed, it is the time of shutter to let the
light into the sensor to properly expose the picture. Shutter speed is measured
in "fractions of a second" like 1/10, 1/15, 1/25, 1/50, 1/60 ....
1/3200, 1/4000.
Slow Shutter
Speed = More light into the sensor = Good for low light situation
Fast Shutter
Speed = Less light into the sensor = Good for freezing motion
3. ISO:
We
can say that ISO is sensitivity of camera to light. It is pronounced as "aiso"
(just to explain I am writing in this way) and not I S O differently. This is
measured in "numbers" like 100, 200, 400, ... 25000. Lower number
means lower sensitivity to light and higher number means higher sensitivity
to light. We get good quality pictures if ISO is in lower
number and grain/noise if the ISO is higher in number.
Higher ISO = More Sensitivity to light = More grain/ Noise
Lower ISO = Less Sensitivity to light = Good quality/ Less Noise From the above we are in a position to understand that what is Aperture, Shutter Speed and ISO. It is also necessary to understand that how these three works in together, what is their impact on a photograph and under what situation we have to use aperture mode, shutter mode or manual mode.
APERTURE:
Now we know
what is Aperture, Shutter Speed and ISO but to explain it more I will try to
explain each concept with some photographs. We will see it in more details and
how these are affected.
These three,
Aperture, Shutter Speed and ISO are just like three legs of a tripod. The whole
photography depends on these three things. We get a good quality photo when
these three are well balanced and you can balance them only if you are well
aware of these three things. One can understand it better if he has practiced a
lot. Let the photo be good or bad, first concentrate on understanding the
function of camera by controlling each and every mode. When we talk about good
photography on the basis of these three settings then we must also not forget
that distance from subject also matters.
So,
considering the situation we have to keep the aperture, suppose we have to
photograph a well lit subject then we don't need to increase the ISO, if we
want to capture that subject with shallow depth of field then we have to keep aperture
wide open and shutter speed needs to be fast.
We will
continue with Aperture, how can we get shallow depth of field and long depth of
field. This has been tested from the same distance and with the same lens 50mm at different aperture.
In this
picture figure(a) you can see the shallow depth of field, rose in background is
completely out of focus, here I set the aperture f/1.8.
In this
picture figure (b) you can see the shallow depth of field, the rose in background
is out of focus, here I set the aperture f/2.8.
 |
| figure (b) Aperture f/2.8 |
In this
picture figure (c) you can see the shallow depth of field, the rose in background
is blurred, here I set the aperture f/4.
 |
| figure (c) Aperture f/4 |
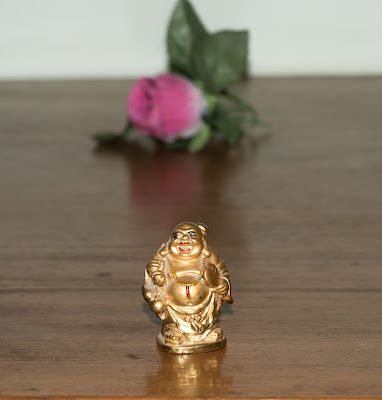
In this
picture figure (d) you can see the depth of field, the rose in background is quite
blurry, here I set the aperture f/5.6.
 |
| figure (d) Aperture f/5.6 |
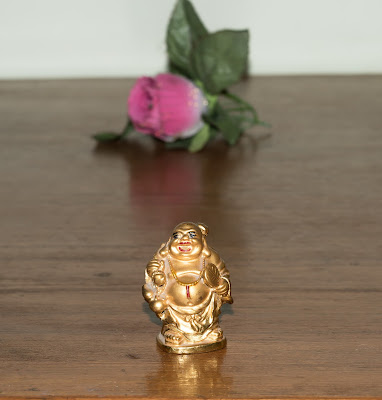
In this
picture figure (e) you can see the depth of field, the rose in background is less
sharp, here I set the aperture f/8.
 |
| figure (e) Aperture f/8 |
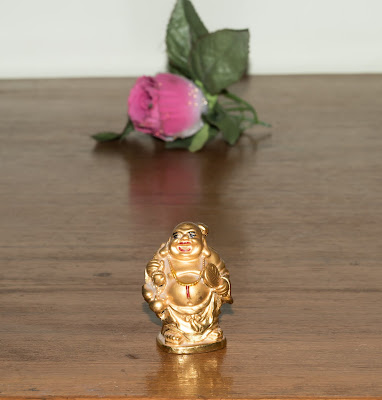
In this
picture figure (f) you can see the depth of field, the rose in background is little
blurry, here I set the aperture f/11.
 |
| figure (f) Aperture f/11 |
In this
picture figure (g) you can see the long depth of field, the rose in background is in focus as compared to others, here I set the aperture f/16.
 |
| figure (g) Aperture f/16 |
If we want to
practice, in this way we can keep on changing the aperture and then its effect on
background of the subject, in this way we can find out that which aperture
brings the sharpness and details in subject and also how far depth of field is
affected.
We can do the
above exercise by keeping our camera in Aperture Priority Mode. This will
automatically adjust the shutter speed, but one thing that we have to keep in
mind is ISO has to be lowest.
Friends, the way I am
presenting here is also my way of learning. I don't know what is your opinion
about my way of explaining, but I am trying hard at my level to explain it as
simply as I can.
SHUTTER SPEED:
When we talk
about shutter speed, it is referred for motion. With shutter speed we can
easily freeze the moving object. Suppose a child is playing in field and we
have to capture that moment then we have to increase the shutter speed, it
means we have to keep fast shutter speed, we may keep it 1/500 sec. If we keep
the slow shutter speed then it will blur the image means photo will not be
clear. Many a times we have seen that when we are taking a picture and suddenly
some movements take place like hand or head movement of a person then it
creates ghostly image which is the cause of slow shutter speed. It means that
longer time passed for the movement to be recorded in the camera, which results
in blurred image.
Slow Shutter speed
is also used to create the many effects in photography like light trails,
softly moving water, to capture a beautiful scene where public movement is more
to get the scene only and to avoid people movement, lightening can also be
photographed.
Fast shutter
speed is used to freeze the motion like jumping people, falling water drops
effect, running person, moving vehicle, bird on flight.
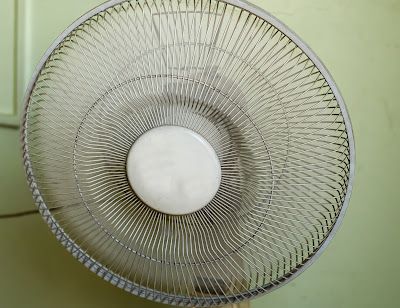
Here we will
try to understand the effect of slow shutter speed and fast shutter speed,
using fan. The blades are moving and we will see that after keeping shutter
speed in 1/30, 1/60, 1/125, 1/250 and 1/500 what effects do we get in our photo.
Through this example we will be in a position to understand that how can we
control the movement and can give desired effect to the moving object.
My basic
intention of taking topic one by one is to understand each concept in depth so
that when we are out in photography we don't have to think much about these
things. This should get stored in our subconscious mind. All settings should
happen automatically as per the situation, our mind should respond to
particular situation immediately.
From
figure-(i) we can see that fan blades are moving as usual what we see
with our naked eyes, this is taken with shutter speed of 1/30.
From figure-(ii) we can see that fan blades are blurry, this is taken with shutter speed of 1/60.
 |
| figure-(ii) shutter speed - 1/60 |
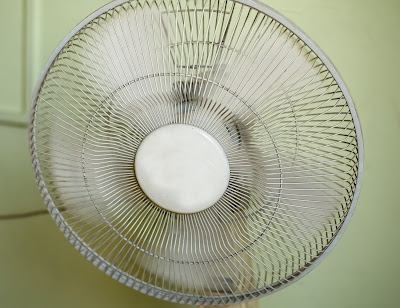
From figure-(iii) we can see that fan blades are moving and are blurry, we can see ghostly effect also, this is taken with shutter speed of 1/125.
 |
| figure-(iii) shutter speed - 1/125 |
From the figure-(iv) we can see that fan blades are moving and are blurry but we can see that more motion freezing effect than the previous one, this is taken with shutter speed of 1/250.
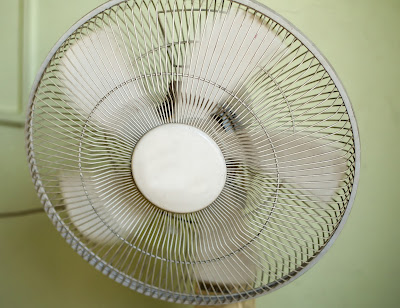 | |
| figure-(iv) shutter speed - 1/250 |
From figure-(v) we can see that moving fan blades are mostly frozen, this is taken with shutter speed of 1/500.
 |
| figure-(v) shutter speed - 1/500 |
From above figure we can see that how the motion can be frozen with the increased shutter speed and how can we give ghostly effect also.
If you find something missing you are free to comment and I will try to cover that also. If you like that also matters a lot to me.
ISO:
ISO:
We have already seen that how aperture and shutter speed
works and now we will see that how ISO works in tandem with shutter speed. In
this we can keep aperture constant and have to move shutter speed according to
increased or decreased ISO.
It is always regarded as good to stick to the lowest ISO (base ISO) of your
camera, which is typically ISO 100 or 200, whenever possible. To maintain the
image quality, it is best to use lowest ISO if good lighting is there. If it is
dim light situation then in that case you have to increase the ISO and if you
want to keep to lowest ISO then you have to mount the camera on tripod because
then you have to reduce the shutter speed
Whenever I have to shoot
indoor without flash then I have to increase the ISO to a level that the
shutter speed is enough to take the shot hand held. sometimes we have to
intentionally increase the ISO that depends on situation like birds on flight
shot, this needs increased shutter speed and therefore ISO needs to be
increased.
In most of the DSLRs, there
is setting of Auto ISO, in this we can set the maximum ISO and when we take a
shot it doesn't increase the ISO more
than the set limit.
Typically, ISO numbers start from 100 (Base ISO) and in
some it is also 50 and it increases even to two lacs or more.
Each time you double the ISO
for an exposure, the camera needs only half as much light for the same
exposure, e.g. if you had a shutter speed of 1/125 at 100 ISO, increasing it to
200 ISO would let you get the same exposure at 1/250 second. This is why high
ISOs are often used indoors, especially for bird on flight and sporting photography. To stop an action fast
shutter speed is needed and photographers
regularly choose high ISO
Higher ISO brings noise/
grain in the image and maximum it is tried to avoid noise in image. Sometimes
photographers intentionally keep grain in their images to bring effect in that
like images with dew or water droplets they create a different impact.
Now a days in digital SLRs a
new revolution has come with the good quality image even keeping ISO at 1250 or
1600.
A better understanding of ISO
along with Shutter Speed and Aperture will help you make smart decisions about
how to set your camera and that, in turn, will lead to a good quality pictures.
Here I will show you with pictures how increased ISO increases the grain or noise in the image.
 |
| Left image with ISO-200 & Right image with ISO-3200 |
If we give a close look we will find grains in the image with ISO-3200
and it also affects the exposure. The above image makes it all clear.
Here we have completed the topic "EXPOSURE TRIANGLE" and the three
pillars of photography i.e. Aperture, Shutter Speed & ISO.
I
have tried my level best to explain this topic and hope that you all
will like this. If anything I missed out let me know by your comments.


interesting bro.......
ReplyDelete😘😘😘
Thank you!!!
Deletekhub bhalo prabhu
ReplyDeleteThanks!!! need all your support.
DeleteThis comment has been removed by the author.
ReplyDeleteGrt daaji... 😃😀👌😃
ReplyDeleteThanks for all your support...!!!
DeleteThis comment has been removed by the author.
ReplyDeleteThis comment has been removed by the author.
ReplyDelete